12.6. (MANUAL) Configuring the server
Note
These instructions relate to manual server installation. For a simpler Docker-based system, see here.
The majority of CamCOPS configuration takes place via the server configuration file. Here, we deal with everything else.
12.6.1. Overview
CamCOPS will operate offline on your tablet, and you can view simple summaries of your tasks there.
You should set up a server to receive data from your CamCOPS tablet(s).
The simplest way (involving only free software) is to set up a Linux (e.g. Ubuntu) computer with an Apache web server and a MySQL database (plus the Python interpreter, which comes with most Linux distributions) – collectively known as a LAMP stack 2. Alternative (e.g. Windows) configurations are possible, but we’ve not used them so do not provide details here.
You must also obtain an HTTPS certificate (or create one for free 3 – not recommended), and configure your web server to do all its CamCOPS work via HTTPS only (not HTTP), so that your information is always encrypted in transit from the tablets to your server. The CamCOPS tablet app will not use unencrypted links. (Where do certificates live on disk? See 1.)
Then, CamCOPS provides software so your web server can receive data from your tablets, and offers a web front end so you can view your tasks in HTML and PDF format, and download data in various formats.
For very advanced analysis, you can use the MySQL database directly.
You must also consider the server’s security carefully; see Security.
Having set up your server, you should point your tablet(s) to it (see configuring the tablet application).
12.6.2. Data flow
A generic CamCOPS server is arranged like this:
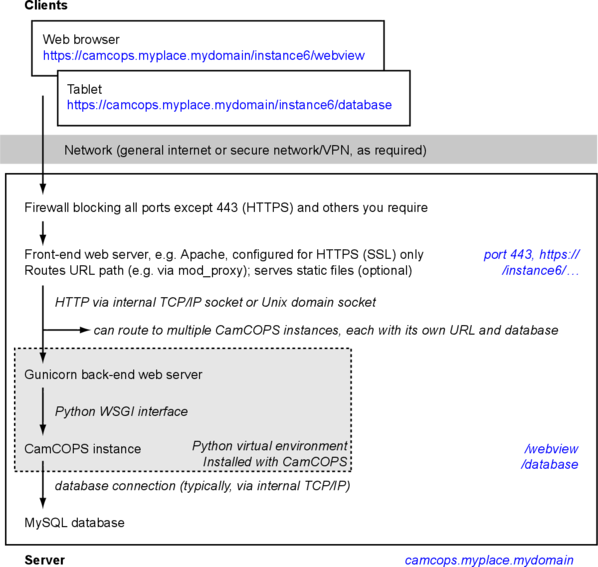
Most servers will use a single database and a single CamCOPS instance, because this is simpler and more powerful. In that simpler case, ignore all reference to “instances” in the figure above.
There are two web servers in this diagram.
The front-end web server talks to the “world”. Users connect to it. Choose a high-performance web server capable of serving static files.
A good choice, regardless of OS, is Apache.
The back-end web server is bundled with CamCOPS. Its code lives in the CamCOPS Python virtual environment. Its job is to serve CamCOPS, and only CamCOPS, to an internal TCP/IP port (or UNIX socket). The front-end web server then routes appropriate requests through to it. CamCOPS offers a choice:
Gunicorn is probably the best choice for deployment under Linux/UNIX. It’s pretty quick. It relies on the UNIX fork() function 5, so it doesn’t run under Windows.
CherryPy is a good cross-platform choice, and definitely the best choice under Windows.
Pyramid is the web framework that CamCOPS uses, and it comes with its own demonstration server. This is handy for running the very helpful Pyramid debug toolbar 4 during testing, but it is definitely not a good choice for deployment.
12.6.3. Plan where to put files
Under Linux, we follow the Filesystem Hierarchy Standard.
Directory |
FHS purpose |
CamCOPS use |
Typical filename |
UNIX permissions |
|---|---|---|---|---|
|
Host-specific system configuration |
CamCOPS config file |
|
Web server user only |
|
Run-time variable data, e.g. PID files, Unix domain sockets. |
Unix domain socket when using Gunicorn. |
|
Web server user only |
|
Data for services provided by this system. |
Images, extra strings, SNOMED data… |
|
Web server user only (or more liberal if you wish) |
|
Application cache data |
Matplotlib cache |
|
Web server user only |
|
Lock files, e.g. for export |
Note: |
|
Web server user only |
|
Log files |
Log files, via Supervisor. |
|
Root only |
|
Temporary files preserved between system reboots |
Temporary user download files, as per USER_DOWNLOAD_DIR. |
|
Web server user only |
For information, these directories are used (or not used, but worthy of comment!) by CamCOPS during installation:
Directory |
FHS purpose |
CamCOPS use |
Typical filename |
UNIX permissions |
|---|---|---|---|---|
|
“Most user commands.” |
CamCOPS launch commands |
|
Public read, root write. |
|
Architecture-independent data. |
CamCOPS itself. This includes Python |
|
Public read, root write. |
|
“For use by the system administrator when installing software locally.” |
Not used. |
Public read, root write. |
|
|
Add-on application software packages. |
Not used. This would be another alternative to |
Public read, root write. |
… plus other Linux/UNIX standards (e.g. the location of man pages).
The location of web server configuration files, databases, backups, and so on is up to you and your system; see Linux flavours.
12.6.4. Configure your firewall
Ensure your firewall is configured properly:
You’ll need to allow HTTPS through, for tablet communications and the web viewer. (The default port is 443; see TCP/IP ports. It’s possible to use another, but it will confuse users.)
You’ll probably want remote SSH access, either through the default port (22), or a secret port known only to you.
Other ports are up to you. If you want to run a plain web server as well, that’ll normally be on port 80. Access to CamCOPS should only be via HTTPS, not plain HTTP.
Disable access to everything you don’t need.
12.6.5. Create a database
The method to create a database depends on the database engine you plan to use. Here’s a method for MySQL to create a database named camcops.
First, from the Linux command line, log in to MySQL as root:
mysql --host=127.0.0.1 --port=3306 --user=root --password
# ... or the usual short form: mysql -u root -p
Then in MySQL:
# Create the database:

CREATE DATABASE camcops;

# Ideally, create another user that only has access to the CamCOPS database.
# You should do this, so that you don’t use the root account unnecessarily.

GRANT ALL PRIVILEGES ON camcops.* TO 'YYYYYY_REPLACE_ME'@'localhost' IDENTIFIED BY 'ZZZZZZ_REPLACE_ME';

# For future use: if you plan to explore your database directly for analysis,
# you may want to create a read-only user. Though it may not be ideal (check:
# are you happy the user can see the audit trail?), you can create a user with
# read-only access to the entire database like this:

GRANT SELECT camcops.* TO 'QQQQQQ_REPLACE_ME'@'localhost' IDENTIFIED BY 'PPPPPP_REPLACE_ME';

# All done. Quit MySQL:

exit
12.6.6. Create/edit a CamCOPS config file
See “The CamCOPS server configuration file”.
The file is typically called /etc/camcops/camcops.conf and should be readable by the web server user, such as www-data under Ubuntu 1.
12.6.7. Create the database structure
To create tables and indexes, use the command:
camcops_server upgrade_db --config CONFIG
where CONFIG is the filename of your configuration file. If your configuration
file is only readable as www-data, you will need to run this with sudo:
sudo -u www-data camcops_server upgrade_db --config CONFIG
12.6.8. Create a superuser
Use the command:
camcops_server make_superuser --config CONFIG
where CONFIG is the filename of your configuration file. (Again, use sudo
as above if your configuration file requires privileged access to read.)
12.6.9. Start CamCOPS
Under Linux, this is best done via Supervisor, which launches programs, keeps log files for them, and restarts them when the computer is rebooted.
To generate a specimen Supervisor configuration file for CamCOPS, run the command
camcops_server demo_supervisor_config > my_demo_camcops_supervisor_config.conf
Here’s an example, which you would typically save as /etc/supervisor/conf.d/camcops.conf:
# =============================================================================
# Demonstration 'supervisor' (supervisord) config file for CamCOPS.
# Created by CamCOPS version 2.4.24.
# =============================================================================
# See https://camcops.readthedocs.io/en/latest/administrator/server_configuration.html#start-camcops

[program:camcops_server]

command = /usr/share/camcops/venv/bin/camcops_server serve_gunicorn
    --config /etc/camcops/camcops.conf

directory = /usr/share/camcops
environment = MPLCONFIGDIR="/var/cache/camcops/matplotlib"
user = www-data
stdout_logfile = /var/log/supervisor/camcops_server.log
redirect_stderr = true
autostart = true
autorestart = true
startsecs = 30
stopwaitsecs = 60

[program:camcops_workers]

command = /usr/share/camcops/venv/bin/camcops_server launch_workers
    --config /etc/camcops/camcops.conf

directory = /usr/share/camcops
environment = MPLCONFIGDIR="/var/cache/camcops/matplotlib"
user = www-data
stdout_logfile = /var/log/supervisor/camcops_workers.log
redirect_stderr = true
autostart = true
autorestart = true
startsecs = 30
stopwaitsecs = 60
startretries = 10
stopasgroup = true

[program:camcops_scheduler]

command = /usr/share/camcops/venv/bin/camcops_server launch_scheduler
    --config /etc/camcops/camcops.conf

directory = /usr/share/camcops
environment = MPLCONFIGDIR="/var/cache/camcops/matplotlib"
user = www-data
stdout_logfile = /var/log/supervisor/camcops_scheduler.log
redirect_stderr = true
autostart = true
autorestart = true
startsecs = 30
stopwaitsecs = 60
startretries = 10

[group:camcops]

programs = camcops_server, camcops_workers, camcops_scheduler
This is where you choose which back-end web server CamCOPS should use (see above), by choosing the command you pass to camcops. For high-performance work under Linux, use Gunicorn, with the serve_gunicorn command; see the options for the camcops_server command.
12.6.9.1. Notes on supervisor and its config files
Supervisor is a system for controlling background processes running on UNIX-like operating systems. See http://supervisord.org
On Ubuntu systems, you would typically install supervisor with
sudo apt
install supervisor
and then save this file as/etc/supervisor/conf.d/camcops.conf.If you edit a supervisord config file, run
sudo service supervisor
restart
(Ubuntu) orsudo service supervisord restart(CentOS 6).To monitor supervisor, run
sudo supervisorctl status, or justsudo supervisorctlfor an interactive prompt.Regarding the supervisor config files:
Indented lines are treated as continuation (even in commands; no need for end-of-line backslashes or similar).
The downside of that is that indented comment blocks can join onto your commands! Beware that.
Indented comment blocks can also break supervisord entirely. If it won’t start, try inspecting with
supervisord -n -c /etc/supervisor/supervisord.conf.You can’t put quotes around the directory variable (http://stackoverflow.com/questions/10653590).
Python programs that are installed within a Python virtual environment automatically use the virtualenv’s copy of Python via their shebang; you do not need to specify that by hand, nor the PYTHONPATH.
The
environmentparameter sets the OS environment.Creating a group (see below; a.k.a. a “heterogeneous process group”) allows you to control all parts of CamCOPS together, as
camcopsin this example (see http://supervisord.org/configuration.html#group-x-section-settings). Thus, you can do, for example:sudo supervisorctl start camcops:*
Specific extra notes for CamCOPS:
The
MPLCONFIGDIRenvironment variable specifies a cache directory formatplotlib, which greatly speeds up its subsequent loading.The typical “web server” user is
www-dataunder Ubuntu Linux andapacheunder CentOS; see Linux flavours.
12.6.10. Point the front-end web server to CamCOPS
Under Linux, a typicaly front-end web server is Apache.
To generate a specimen Apache configuration file for CamCOPS, run the command
camcops_server demo_apache_config > demo_apache_config_chunk.txt
Here’s an example to mount CamCOPS at the URL path /camcops, which you would edit into the Apache config file 1:
# Demonstration Apache config file section for CamCOPS.
# Created by CamCOPS version 2.4.24.
#
# Under Ubuntu, the Apache config will be somewhere in /etc/apache2/
# Under CentOS, the Apache config will be somewhere in /etc/httpd/
#
# This section should go within the <VirtualHost> directive for the secure
# (SSL, HTTPS) part of the web site.

<VirtualHost *:443>
    # ...

    # =========================================================================
    # CamCOPS
    # =========================================================================
    # Apache operates on the principle that the first match wins. So, if we
    # want to serve CamCOPS but then override some of its URLs to serve static
    # files faster, we define the static stuff first.

        # ---------------------------------------------------------------------
        # 1. Serve static files
        # ---------------------------------------------------------------------
        # a) offer them at the appropriate URL
        # b) provide permission
        # c) disable ProxyPass for static files

        # CHANGE THIS: aim the alias at your own institutional logo.

    Alias /static/logo_local.png /usr/share/camcops/venv/lib/python3.10/site-packages/camcops_server/static/logo_local.png

        # We move from more specific to less specific aliases; the first match
        # takes precedence. (Apache will warn about conflicting aliases if
        # specified in a wrong, less-to-more-specific, order.)

    Alias /static/ /usr/share/camcops/venv/lib/python3.10/site-packages/camcops_server/static/

    <Directory /usr/share/camcops/venv/lib/python3.10/site-packages/camcops_server/static>
        Require all granted

        # ... for old Apache versions (e.g. 2.2), use instead:
        # Order allow,deny
        # Allow from all
    </Directory>

        # Don't ProxyPass the static files; we'll serve them via Apache.

    ProxyPassMatch ^/static/ !

        # ---------------------------------------------------------------------
        # 2. Proxy requests to the CamCOPS web server and back; allow access
        # ---------------------------------------------------------------------
        # ... either via an internal TCP/IP port (e.g. 1024 or higher, and NOT
        #     accessible to users);
        # ... or, better, via a Unix socket, e.g. /run/camcops/camcops.socket
        #
        # NOTES
        #
        # - When you ProxyPass /, you should browse to (e.g.)
        #
        #       https://camcops.example.com/
        #
        #   and point your tablet devices to
        #
        #       https://camcops.example.com/api
        #
        # - Ensure that you put the CORRECT PROTOCOL (http, https) in the rules
        #   below.
        #
        # - For ProxyPass options, see https://httpd.apache.org/docs/2.2/mod/mod_proxy.html#proxypass
        #
        #   - Include "retry=0" to stop Apache disabling the connection for
        #     while on failure.
        #   - Consider adding a "timeout=<seconds>" option if the back-end is
        #     slow and causing timeouts.
        #
        # - CamCOPS MUST BE TOLD about its location and protocol, because that
        #   information is critical for synthesizing URLs, but is stripped out
        #   by the reverse proxy system. There are two ways:
        #
        #   (i)  specifying headers or WSGI environment variables, such as
        #        the HTTP(S) headers X-Forwarded-Proto and X-Script-Name below
        #        (and telling CamCOPS to trust them via its
        #        TRUSTED_PROXY_HEADERS setting);
        #
        #   (ii) specifying other options to "camcops_server", including
        #        PROXY_SCRIPT_NAME, PROXY_URL_SCHEME; see the help for the
        #        CamCOPS config.
        #
        # So:
        #
        # ~~~~~~~~~~~~~~~~~~~~~~~~~~~~~~~~~~~~~~~~~~~~~~~~~~~~~~~~~~~~~~~~~~~~~
        # (a) Reverse proxy
        # ~~~~~~~~~~~~~~~~~~~~~~~~~~~~~~~~~~~~~~~~~~~~~~~~~~~~~~~~~~~~~~~~~~~~~
        #
        # #####################################################################
        # PORT METHOD
        # #####################################################################
        # Note the use of "http" (reflecting the backend), not https (like the
        # front end).

    # ProxyPass / http://127.0.0.1:8000 retry=0 timeout=300
    # ProxyPassReverse / http://127.0.0.1:8000

        # #####################################################################
        # UNIX SOCKET METHOD (Apache 2.4.9 and higher)
        # #####################################################################
        # This requires Apache 2.4.9, and passes after the '|' character a URL
        # that determines the Host: value of the request; see
        # ://httpd.apache.org/docs/trunk/mod/mod_proxy.html#proxypass
        #
        # The general syntax is:
        #
        #   ProxyPass /URL_USER_SEES unix:SOCKETFILE|PROTOCOL://HOST/EXTRA_URL_FOR_BACKEND retry=0
        #
        # Note that:
        #
        #   - the protocol should be http, not https (Apache deals with the
        #     HTTPS part and passes HTTP on)
        #   - the EXTRA_URL_FOR_BACKEND needs to be (a) unique for each
        #     instance or Apache will use a single worker for multiple
        #     instances, and (b) blank for the backend's benefit. Since those
        #     two conflict when there's >1 instance, there's a problem.
        #   - Normally, HOST is given as localhost. It may be that this problem
        #     is solved by using a dummy unique value for HOST:
        #     https://bz.apache.org/bugzilla/show_bug.cgi?id=54101#c1
        #
        # If your Apache version is too old, you will get the error
        #
        #   "AH00526: Syntax error on line 56 of /etc/apache2/sites-enabled/SOMETHING:
        #    ProxyPass URL must be absolute!"
        #
        # If you get this error:
        #
        #   AH01146: Ignoring parameter 'retry=0' for worker 'unix:/tmp/.camcops_gunicorn.sock|https://localhost' because of worker sharing
        #   https://wiki.apache.org/httpd/ListOfErrors
        #
        # ... then your URLs are overlapping and should be redone or sorted;
        # see http://httpd.apache.org/docs/2.4/mod/mod_proxy.html#workers
        #
        # The part that must be unique for each instance, with no part a
        # leading substring of any other, is THIS_BIT in:
        #
        #   ProxyPass /URL_USER_SEES unix:SOCKETFILE|http://localhost/THIS_BIT retry=0
        #
        # If you get an error like this:
        #
        #   AH01144: No protocol handler was valid for the URL /SOMEWHERE. If you are using a DSO version of mod_proxy, make sure the proxy submodules are included in the configuration using LoadModule.
        #
        # Then do this:
        #
        #   sudo a2enmod proxy proxy_http
        #   sudo apache2ctl restart
        #
        # If you get an error like this:
        #
        #   ... [proxy_http:error] [pid 32747] (103)Software caused connection abort: [client 109.151.49.173:56898] AH01102: error reading status line from remote server httpd-UDS:0
        #       [proxy:error] [pid 32747] [client 109.151.49.173:56898] AH00898: Error reading from remote server returned by /camcops_bruhl/webview
        #
        # then check you are specifying http://, not https://, in the ProxyPass
        #
        # Other information sources:
        #
        # - https://emptyhammock.com/projects/info/pyweb/webconfig.html

    ProxyPass / unix:/run/camcops/camcops.socket|http://dummy1 retry=0 timeout=300
    ProxyPassReverse / unix:/run/camcops/camcops.socket|http://dummy1

        # ~~~~~~~~~~~~~~~~~~~~~~~~~~~~~~~~~~~~~~~~~~~~~~~~~~~~~~~~~~~~~~~~~~~~~
        # (b) Allow proxy over SSL.
        # ~~~~~~~~~~~~~~~~~~~~~~~~~~~~~~~~~~~~~~~~~~~~~~~~~~~~~~~~~~~~~~~~~~~~~
        # Without this, you will get errors like:
        #   ... SSL Proxy requested for wombat:443 but not enabled [Hint: SSLProxyEngine]
        #   ... failed to enable ssl support for 0.0.0.0:0 (httpd-UDS)

    SSLProxyEngine on

    <Location />

            # ~~~~~~~~~~~~~~~~~~~~~~~~~~~~~~~~~~~~~~~~~~~~~~~~~~~~~~~~~~~~~~~~~
            # (c) Allow access
            # ~~~~~~~~~~~~~~~~~~~~~~~~~~~~~~~~~~~~~~~~~~~~~~~~~~~~~~~~~~~~~~~~~

        Require all granted

            # ... for old Apache versions (e.g. 2.2), use instead:
            #
            #   Order allow,deny
            #   Allow from all

            # ~~~~~~~~~~~~~~~~~~~~~~~~~~~~~~~~~~~~~~~~~~~~~~~~~~~~~~~~~~~~~~~~~
            # (d) Tell the proxied application that we are using HTTPS, and
            #     where the application is installed
            # ~~~~~~~~~~~~~~~~~~~~~~~~~~~~~~~~~~~~~~~~~~~~~~~~~~~~~~~~~~~~~~~~~
            #     ... https://stackoverflow.com/questions/16042647
            #
            # Enable mod_headers (e.g. "sudo a2enmod headers") and set:

        RequestHeader set X-Forwarded-Proto https

            # ... then ensure the TRUSTED_PROXY_HEADERS setting in the CamCOPS
            # config file includes:
            #
            #           HTTP_X_FORWARDED_HOST
            #           HTTP_X_FORWARDED_SERVER
            #           HTTP_X_FORWARDED_PORT
            #           HTTP_X_FORWARDED_PROTO
            #           HTTP_X_SCRIPT_NAME
            #
            # (X-Forwarded-For, X-Forwarded-Host, and X-Forwarded-Server are
            # supplied by Apache automatically.)

    </Location>

    #==========================================================================
    # SSL security (for HTTPS)
    #==========================================================================

        # You will also need to install your SSL certificate; see the
        # instructions that came with it. You get a certificate by creating a
        # certificate signing request (CSR). You enter some details about your
        # site, and a software tool makes (1) a private key, which you keep
        # utterly private, and (2) a CSR, which you send to a Certificate
        # Authority (CA) for signing. They send back a signed certificate, and
        # a chain of certificates leading from yours to a trusted root CA.
        #
        # You can create your own (a 'snake-oil' certificate), but your tablets
        # and browsers will not trust it, so this is a bad idea.
        #
        # Once you have your certificate: edit and uncomment these lines:

    # SSLEngine on

    # SSLCertificateKeyFile /etc/ssl/private/my.private.key

        # ... a private file that you made before creating the certificate
        # request, and NEVER GAVE TO ANYBODY, and NEVER WILL (or your
        # security is broken and you need a new certificate).

    # SSLCertificateFile /etc/ssl/certs/my.public.cert

        # ... signed and supplied to you by the certificate authority (CA),
        # from the public certificate you sent to them.

    # SSLCertificateChainFile /etc/ssl/certs/my-institution.ca-bundle

        # ... made from additional certificates in a chain, supplied to you by
        # the CA. For example, mine is univcam.ca-bundle, made with the
        # command:
        #
        # cat TERENASSLCA.crt UTNAddTrustServer_CA.crt AddTrustExternalCARoot.crt > univcam.ca-bundle

</VirtualHost>
Once you are happy with your Apache config file:
Ensure file ownerships/permissions are correct (including, on CentOS, SELinux permissions 6).
On Ubuntu, if you use /srv/www as your DocumentRoot, you may need to do:
sudo chown -R www-data:www-data /srv/www
On CentOS, assuming you use /var/www as your DocumentRoot, you may need to do:
ls -alZ /var/www # shows owners and SELinux security context

sudo chown -R apache:apache /var/www
sudo chcon -R -h system_u:object_r:httpd_sys_content_t /var/www
sudo chown -R apache:apache /etc/camcops
sudo chcon -R -h system_u:object_r:httpd_sys_content_t /etc/camcops
sudo chown -R apache:apache /var/cache/camcops
sudo chcon -R -h system_u:object_r:httpd_sys_content_t /var/cache/camcops
sudo chown -R apache:apache /usr/share/camcops/server/static
sudo chcon -R -h system_u:object_r:httpd_sys_content_t /usr/share/camcops/server/static
Restart Apache:
sudo apachectl restart.Ensure Apache restarts on boot.
On Ubuntu, this should be automatic.
On CentOS, run:
sudo chkconfig --level 2345 httpd on
12.6.11. Browse to the web site
If you have configured things correctly, the rest of the configuration should be possible via the CamCOPS web site.
Assuming you used /camcops as the base URL path,
Browse to https://YOURHOST/camcops/webview. This should work.
Browse to http://YOURHOST/camcops/webview. This should not work; you shouldn’t allow access via plain HTTP.
Check that a tablet device can register with the server and upload some data while using the URL https://YOURHOST/camcops/database.
12.6.12. Troubleshooting access to the web site
If something isn’t working, begin by trying the following (as a user that can definitely read the config file):
cat /PATH/TO/YOUR_CONFIG_FILE  # can I read it?
camcops_server serve_pyramid --config /PATH/TO/YOUR_CONFIG_FILE
Note the URL and port, likely
localhoston port 8000, and in a separate command prompt, try:wget http://127.0.0.1:8000The server should report a “GET / HTTP” message and the
wgetcommand should return HTML with a “login failed” message, but if so, this shows that CamCOPS is reading the config file and serving data correctly.If a UNIX socket method wasn’t working, try a TCP/IP port method.
If a TCP/IP method works and a Unix socket doesn’t, with Apache, then check the Apache config file and make sure the “internal” unique dummy URL associated with the socket is using “http”, not “https”. See the demo Apache config file.
If, when using Apache, you get errors like
Page not found! //login, then there is a slash error; potentially you have an incorrect slash at the end of the Unix domain socket “dummy” URL.
12.6.13. Configure backups
Your backup strategy is up to you. However, one option is to use a script to dump all MySQL databases. A tool, camcops_backup_mysql_database, is provided to help you:
If you use this strategy, you will need to save this script and edit the copy.
Be sure your copy of the script is readable only by root and the backup user,
as it contains a password. You can then run your script regularly from
/etc/crontab (see man cron, man crontab).
Obviously, you will also need the dumped files to be backed up to a physically secure location regularly.
If you want to keep daily backups for a few days, then only weekly or monthly backups (etc.), you could use a script like this:
#!/bin/bash
# prune_camcops_backups.sh
#
# Removes backups except those from the first of the month or within the most
# recent month.

CAMCOPS_BACKUP_DIR=/var/backups/mysql  # edit this
DATABASE_NAME=camcops  # edit this

find "${CAMCOPS_BACKUP_DIR}" \
    -depth \
    -maxdepth 1 \
    -mtime +31 \
    -type f \
    -name "${DATABASE_NAME}_*.sql" \
    -not -name "${DATABASE_NAME}_??????01T??????*.sql" \
    -print

# Explanation:
#
#   find "${CAMCOPS_BACKUP_DIR}"
#       ... find files starting at this directory
#   -depth
#       ... use depth-first processing (implied by "-delete", so use "-depth"
#           explicitly if you might ever use "-delete" with the same command,
#           so results are consistent)
#   -maxdepth 1
#       ... go at most 1 level deep into the starting directory (i.e. look only
#           at the contents of the starting directory)
#   -type f
#       ... find only regular files (not e.g. directories)
#   -mtime +31
#       ... restrict to files whose modification time (mtime) is at least 31
#           days ago (in fact at least 32; see "man find" under "-atime"); we
#           want to ignore younger files
#   -name "${DATABASE_NAME}_*.sql"
#       ... find only files with this base filename spec (case-sensitive; use
#           -iname for insensitive)
#   -not -name "${DATABASE_NAME}_??????01T??????*.sql"
#       ... ignore files dated the first of the month (which we want to keep);
#           the date/time format is YYYYmmddTHHMMSS
#   -print
#       ... for each file found, print the filename; an equivalent is
#           "-exec ls {} \;", which executes "ls <FILENAME>" for each file
#           found
#       ... replace this with "-delete" or "-exec rm {} \;" to delete the files
#
# If you use "-print", piping the output to sort with "| sort" may help.
12.6.14. More than one CamCOPS instance
This is simple to set up, but fiddly to maintain. Try to avoid it! Using one database and groups is much better. But if you have to:
Create a second CamCOPS database (from the MySQL command line) as above.
Be careful: MySQL users are system-wide. So don’t think you can have a user named camcopsmaster with password X for one database, and a user named camcopsmaster with password Y for another database; attempting this will merely change the password for that (single) user.
Create a second CamCOPS configuration file, e.g. copying /etc/camcops/camcops.conf to /etc/camcops/camcops2.conf and editing it to point to the new database.
Run
camcopsfrom the command line, pointing it to the new configuration file, to create the tables and a superuser (as above).Add a second instance to the Apache configuration file and restart Apache.
12.6.15. Database performance tuning
Ignore this section unless you actually have performance problems.
12.6.15.1. MySQL/InnoDB commit
Network latency can be improved considerably by altering the MySQL/InnoDB log-on-commit behaviour. This is governed by the innodb_flush_log_at_trx_commit variable. The default is 1, which is the safest; it is required for ACID compliance. However, setting it to 2 makes database write operations much faster.
This can by done by editing the MySQL configuration file 1 to add this line:
[mysqld]

innodb_flush_log_at_trx_commit = 2
after which you would need to restart MySQL 1. Alternatively you can change it dynamically at the MySQL command line with:
SET GLOBAL innodb_flush_log_at_trx_commit = 2;

# Use SHOW VARIABLES; to show the current values.
See also:
Footnotes
- 1(1,2,3,4,5)
See Linux flavours for a reminder of some common differences between Linux operating systems.
- 2
- 3
This is referred to as creating a “snake oil” certificate. See e.g. https://en.wikipedia.org/wiki/Snake_oil_(cryptography); http://www.akadia.com/services/ssh_test_certificate.html
- 4
https://docs.pylonsproject.org/projects/pyramid_debugtoolbar/
- 5
- 6
See http://wiki.apache.org/httpd/13PermissionDenied and https://access.redhat.com/site/documentation/en-US/Red_Hat_Enterprise_Linux/6/html/Managing_Confined_Services/chap-Managing_Confined_Services-The_Apache_HTTP_Server.html
- 7(1,2)
The exact intended location of third-party software under Ubuntu is a bit debated. See e.g.
https://www.linuxjournal.com/magazine/pointcounterpoint-opt-vs-usrlocal
https://askubuntu.com/questions/722968/why-should-i-move-everything-into-opt/722972 – “Second, /opt is used for third-party software, which in the context of Ubuntu, means precompiled software that is not distributed via Debian packages.”
https://unix.stackexchange.com/questions/11544/what-is-the-difference-between-opt-and-usr-local – including “The basic difference is that /usr/local is for software not managed by the system packager, but still following the standard unix deployment rules.”
CamCOPS is managed by the system package manager and follows e.g. Debian policy, checked by Lintian.